How to Upgrade or Add Storage to the iPhone 7 from 32GB to 128GB Easily
Lots of the smart phone users they are facing a same problem, that’s the phone memory space is not enough or out of memory space. Especially, the smart phone is not accepted external memory card. Below is an article to show you how to upgrade or add storage to the iPhone-7 from 32GB space to 128GB! A customer came with an Apple iPhone-7 (32GB) and complaint with not enough space to use. So, she wants to upgrade the space from 32GB to 128GB.
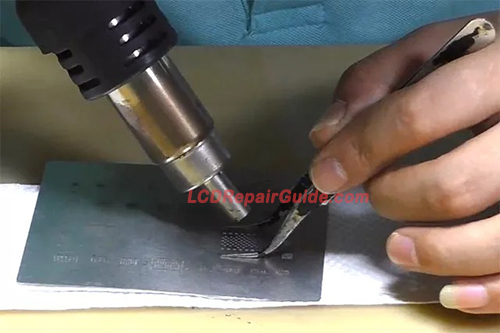
Step-1: Before starting to upgrade the iPhone storage/space, make sure the smart phone is in good condition. Also make sure the screen is okay, no any broken mark, smart phone covers no any fell to the ground mark and so on. Step-2: Need to check this iPhone is suitable to upgrade or not. After dismantle the iPhone-7, the iPhone PCB condition is suitable to upgrade their storage. For example, make sure the iPhone PCB is no any water signs inside or the PCB was not repaired before, etc. If everything is okay, put the iPhone PCB on the Mainboard Repair PCB Holder Fixture. Step-3: Removed the NAND flash glue. For your information, the iPhone storage space or the “Harddisk”, is using the NAND flash memory chip. Also, most of the smart phone is use the NAND or latest design of flash memory chip as their storage space. Use the QUICK 861DW hot air gun with 250ºC and 50 of wind speed. Attention the strength of the scraper when remove the glue. Also be careful the NAND flash chip surrounding small components, don’t touch them.
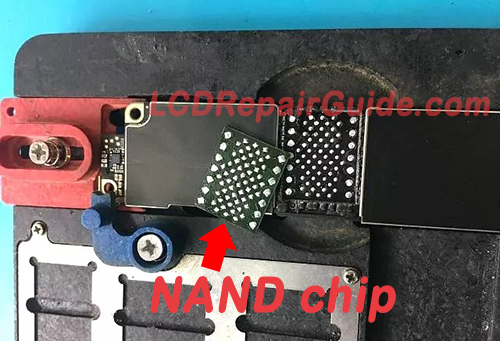
Step-4: After removed the NAND flash chip glue, this is the time to remove/prying the Harddisk (NAND chip) now with tool like tweezer. Set the hot air gun with 350ºC and 50 wind speed. The hand with hot air gun needs to rotate faster to let the heat evenly on NAND chip surface. This will prevent their bottom solder balls not missing under the NAND chip. Also it will help to remove the NAND chip faster. Don’t forget to attention the small SMD components surrounding this chip.
The above photo is the NAND chip location, where using this location to easily & safely to remove/prying the chip. But you also can use another side of the chip to remove it, but make sure it is safely to remove the NAND chip and don’t forget to keep attention their small smd components. Step-5: After removed the NAND chip, need to clean-up their glue. Use the hot air gun with 250ºC & 50 wind speed. Also use the low temperature solder and flux to remove the dirty glue surrounded there. If you’re not doing this step after removed the NAND chip, it will have some “side effect”. The side effect is when this smart phone has some medium vibration/shake (or fell on the ground) on it, it will easily cause the NAND chip dry/bad solder point! If you follow this step, the added storage/harddisk quality will same as the original.
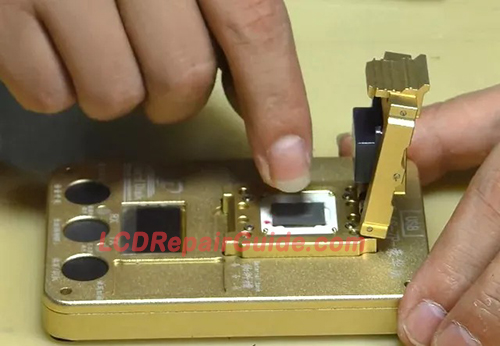
Step-6: Use the programmer to Read/Write their root data on the old NAND chip and new NAND chip. After the NAND chip removed from the iPhone PCB, use the programmer to read their original root data like: serial number, WIFI, Bluetooth address & etc. Attention to the chip pin-1 position, if not it cannot success to read or write the chip. Please refer to the chip with a small round dot to the Red arrow on the programmer there.
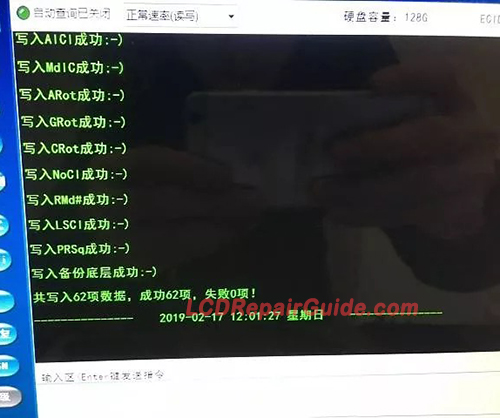
New NAND flash chip written their original root data successfully. For the Apple iPhone 6S or latest model, after replaced their WIFI chip need to untie WIFI from harddisk. So, you can untie the WIFI from this programmer, too.
Step-7: New NAND chip need to do the reballing step. Step-8: After reballing the NAND chip, this is the time to soldering back NAND chip to iPhone PCB. Use the 310ºC, Channel 3, to solder back the NAND chip. Also make sure their NAND chip pin-1 (round dot) is in right position!
Step-9: After the new harddisk is cold down, assembly back the PCB. Install back their system & software. Activate the new 128GB iPhone-7 now!
Step-10: Testing the iPhone, for example to save and delete the files, WIFI, Bluetooth, and etc. Finally, this Apple iPhone-7 was successfully upgrade from 32GB to 128GB now.
New 2019 LED/LCD TV T-CON & Panel Repair Guide is Pre-Launch now!
Best of LED/LCD Screen Panel Repair Guide
Best Ebooks to learn Troubleshooting & Repairing Smart OLED/LED/LCD TV Mainboard
Learn the Basic info for LCD & LED TV T-con Repair and TV Mainboard repairing information. It will helps to you in LCD & LED TV Repair!
PV1-Plasma TV Repair Tips Ebook by Kent Liew:
One of the Best Laptop Repair Ebook: Laptop Chip Level Repair Guide
|


|