How to Fix Apple iPhone 6s That Can’t Turn On
Step-1: Plug in and Check the Current
1. Short circuit when plugged in: Test the following two parts to see if VBATT and VCC MAIN have been
short-circuited.
a) Check if the battery's positive contact connects with the ground wire. Lower the voltage, increase current
density for the positive contact and gradually increase the voltage to see which part of the motherboard heats
up.
b) Ensure two ends of capacitors C2085 and C2088 connect with the ground wires. Plug in the left side of C2088 and
gradually increase the voltage to see which part heats up. (See Figure
One)

2.
Insufficient charge current when plugged into the power supply. See whether it results from electric leakage or
auto power output.
3. Power button not responding when plugged into the power supply: check the power input and power control. Ensure
the power interface voltage, namely J47004 4-foo/pins, reaches 1.8V. If not, check if the resistors R4710 and R0952
are well connected. To repair, short circuit the R4710 (using conductors to connect with) and replace the R0952.
(See Figure Two and Three)


4. Turn on the power button to plug into the power supply and observe the current conditions: Check if the power
output performs well, the voltage and resistance value fall within normal range. Power supply failure or output
leakage might lead to the voltage out of normal range. Ensure the following voltages fall within normal range:
(See Figure Four)

A. Check if the voltage of C2022 reaches 0.8V.
B. Check if the voltage of C2130 reaches 1.1V
C. Check if the voltage of C2132 reaches 1.8V.
D. Check if the voltage of C1320 reaches 1.8V.
E. Check if the voltage of C2000 reaches 1.0V.
F. Check if the voltage of C2070 reaches 1.0V
Step-2: Power on and Reset
1. Check if it able to rest. If the voltage of R2260 does not reach 1.8V, it might be because that R2260 gets wet
or there exits cold solder joint.
Notes: Do not short circuit. Alternatively replace with a low value resistor. (See Figure Five)

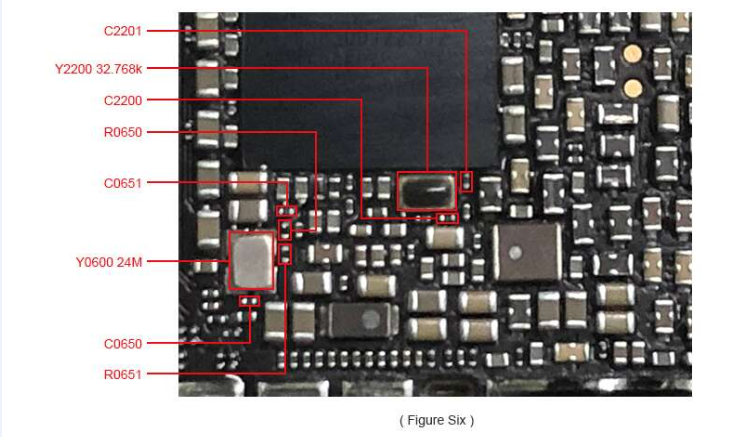
Step-3: Check the Clock Signal
Check if the main clock (namely 24M crystal oscillator) and 32K work well.
1. Test if the Y0600 voltage reaches 0.9V. Do not short circuit resistors R0650 and R0651. Do not remove
capacitors C0650 and C0651.
2. Real time clocks 32K and Y2200 were damaged and the current 80mA stopped stills. Do not remove the power and two
ends of the capacitors C2200 and C2201, otherwise it is very like to cause damages. (See Figure Six)
Step-4: Check the l2C Bus
1. The irregular performance of the first group of I2C bus might lead to power failure and power button
current fluctuating repeatedly (between 0 to 70mA). Do not short circuit the water resistors R0900 and R0901, which
is likely to cause cold solder joint. If the IC is showed to be short circuited, remove it and test again. Test the
following parts shown as Figure below: (See Figure
Seven)
2. The irregular performance of the second group of I2C bus might lead to power button current
fluctuating repeatedly (from 0 to 80mA and 80mA to 120mA). (See Figure
Eight)
3. The irregular performance of the third group of I2C bus might lead to power on and power off
repeatedly with flashing failure code 4013. Please check the resistors R0904 and R0905. (See Figure Nine)
4. The irregular performance of the AP chip U0900 might lead to power on and power off repeatedly with flashing
failure code 9. (See Figure Ten)

Step-5: Logic Processing
Connect with the computer and flash the
mobile phone with ITU.
1. Fail to connect with the computer
a)
Check if the processor has been set up. The current falls around 70mA when starting up.
b)
Check if the power current trembles. If so, it might tall to connect with the computer. In this case, force to
enable DFU mode as to successfully connect with the computer.
c) Check the USB cable is accessible and measure the positive contact/point.
2. Hard Disk
Flash the mobile phone and it would display the code 4014 with the screen lighting up and show numbers of
9.14,4013,1005 and 6. This would lead to the hard disk damage. Replace with a new hard disk. Modify the serial
number and unbind the Wi-Fi encryption.
3. Cache
The current trembles within the range of 0-6-80mA-120mA. Flash the mobile phone and it would turn black
screen with failure code of 4014/4005, leading to the damage of Ag's upper cover and the hard disk damage. Replace
with a new hard disk with no need to flashing.
4. Processor
If the phone flashes failure with code 4005, then it might be processor failure.
|