How to Use RT809H Programmer to Read/Write Samsung TV MCU-WT61P808
Today come with a Samsung HG48AC690 Smart LED TV with problem no power. After checked the Power Supply (PSU), found that their standby circuit component fails. Continues to check the PSU output voltages and found the standby voltage is appear but no PS_ON feedback from the TV Mainboard.
For your information, nowadays, lots of the Samsung Smart types TV has this issue. When their PSU standby circuit failure, it will affect or damage their MCU firmware (corrupted) or MCU chip damage.
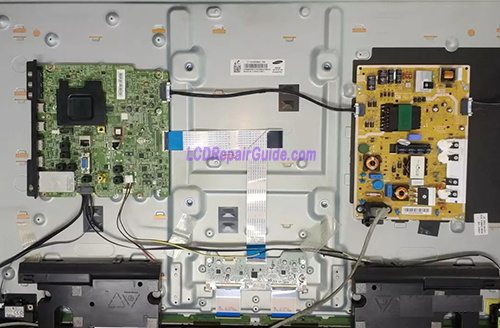
In this Samsung TV, their Mainboard MCU chip was damage and need to replace it. Please refer to the above photo for more details of their location, replace the MCU chip WT61P808. After that use the RT809H programmer to do the Read/Write steps. Make sure that the RT809H programmer firmware upgraded to the latest version. You can go to my website to subscribe and get the link to download the software.
After replaced the MCU WT61P808 chip in Samsung HG48AC690D TV Mainboard, as photo below:
Use the RT809H programmer VGA cable connect to TV Mainboard VGA port with ISP VGA connected. Open the RT809H software and select the chip part number “WT61P808#ISP. Power on the TV Mainboard now, click the “OPEN” to open the computer file location, and select the correct firmware of WT61P808, follow by clicking the “WRITE” button and waiting the process complete.
After the finished programming the MCU chip, power off Tv, remove all the connection in between the programmer and TV Mainboard. Again, power on tv Samsung Smart Tv, and it is back to normal now! Job done!
New 2019 LED/LCD TV T-CON & Panel Repair Guide is Pre-Launch now!
Best of LED/LCD Screen Panel Repair Guide
Best Ebooks to learn Troubleshooting & Repairing Smart OLED/LED/LCD TV Mainboard
Learn the Basic info for LCD & LED TV T-con Repair and TV Mainboard repairing information. It will helps to you in LCD & LED TV Repair!
PV1-Plasma TV Repair Tips Ebook by Kent Liew:
One of the Best Laptop Repair Ebook: Laptop Chip Level Repair Guide
|
|


