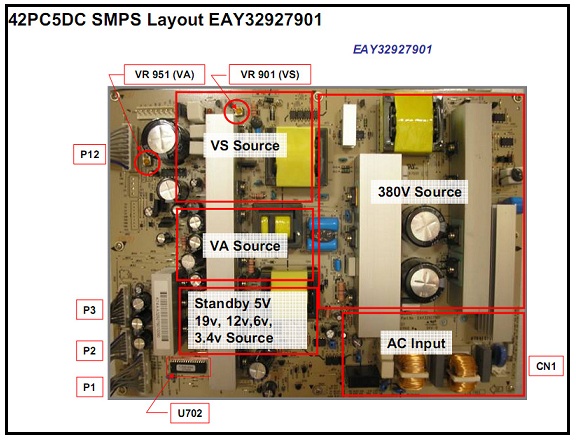
LG 42PC5DC Plasma TV Switch Mode Power Supply Operation and Troubleshooting There are 2 different Power Supply Boards used in the 42PC5DC Plasma TV. One board is (EAY3297901) and the other one (EAY32808901). Both circuit boards operate the same and can be substituted with each other although care must be taken because of the differences, not only are the connectors marked differently but they are reversed from top to bottom, except for the VA and VS connector which although marked with a different connector, the number pin out are the same. Another difference is that the VA and VS Controls have circuit symbol numbers reversed between the boards. VR901 on one board is VS and on the other it will be VA.
AC Voltage is supplied to the SMPS Board at Connector CN1 from the AC Input Filter. Standby 5V is developed from the Circuits of Transformer T201, RC401, RC402 and Q422. Standby 5V is then routed to 2 places, the Micro Processor IC4015 on the Main Board and to the Sub Micon U702 on the SMPS, where AC – ON / DETECT is developed and sent from Pin 1 of Connector P1 to IC4015. With the presence of both 5V STB and AC – ON/ DETECT, IC4015 is active. When IC4015 receives an “ ON “ Command from either the Keyboard or the Remote IR Signal, it outputs a high to RL-ON which enters the SMPS Board at Pin 2 of P1 and M5V-ON. The high RL-ON Voltage is sensed by the Sub Micon U702 which causes the Relay RL102 to close turning on the 380V Supply developing the 19V,12V and 6V Voltage Sources. The 3.4V line at P3 (Pins 1 and 2) also P2 (Pin 7) becomes active when Pin 13 the 3.4V-ON line of connector P1 goes high turning on the 3.4V Supply. The M5V-ON Line located on the SMPS at Connector P1 (Pin 7) is sensed by U702 the Sub Micon IC turning on the 5V VCC line. The last step to bring the supply to “Full Power” occurs when IC4015 brings the VS-ON line high at Pin 5 of Connector P1 the SMPS Board which when sensed by the U702 Sub Micon IC turns on the VA and VS Supplies. The Operating Sequence discussed above can be confirmed by using the Oscilloscope in the XY Mode. Start by connecting Channel 1 of the Oscilloscope to 5V STB and Channel 2 to AC DET the delay between 5V STB and AC DET can be noted. Next Connect Channel 1 to RL ON and Channel 2 to VS ON again the delay between the 2 voltages can be noted. Connect Channel 1 to RL ON and Channel 2 to M5V-ON the 2 supplies come up at the same time proving the 5V VCC line becomes active before the VS ON line. Remember if a voltage is missing check for proper
resistance before proceeding Check the Power On LED for Operation, a Red LED indicates a presence of 5V STB and AC-ON/DETECT. Failure of the Power ON LED to light is an indication of loss of 5V STB or AC ON/ Detect remember the 5V STB and AC-ON/DETECT are developed on the SMPS and sent to the Main Board. Listen for Relay Click, the click of the Relay is an indication of RL-ON going high. RL-ON is sent from the Main Board to the SMPS and when present U702 controls the Relay Operation. RL-ON going High and no Relay is a failure of the SMPS, RL-ON staying low is a failure of the Main Board.
Relay Operation means that the SMPS if working properly will output 19V, 12V and 6V to the Main Board. If the Relay closed and these supplies failed suspect a problem with the SMPS. 3.4V-ON will activate the 3.4V Supply to the Main Board, at this time Audio should be present as the Tuner and Signal Processing circuits are operational.
The next step of operation calls for the M5V-ON line from the Main Board to the SMPS to go high. A high on the M5V-ON Line activates the 5V Vcc line. Loss of 5V Vcc results in no Raster, no Reset, no Y, Z, Control or X Board operation. Loss of 5V and M5V-ON going high could be caused by any of these boards or failure of the SMPS. M5V-ON staying low indicates a problem on the Main Board. VS-ON is the last step of the Power Sequence and is responsible for bringing the VS and VA Voltages up. The VS-ON signal is sent from the Main Board to the SMPS as a high, VS and VA and full operation of the Display Panel are now enabled. Loss of VS-ON results in loss of VA and VS and no Raster, no Reset but Audio would be present. If VS-ON went high and VS and VA where missing the problem could be caused by a failure on the SMPS or a circuit using these voltages. A Resistance check should narrow the possible failures quickly.
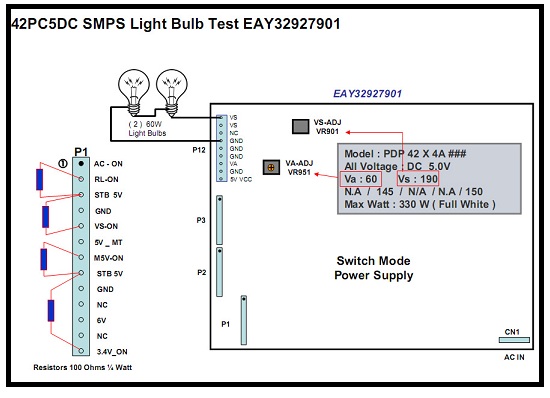
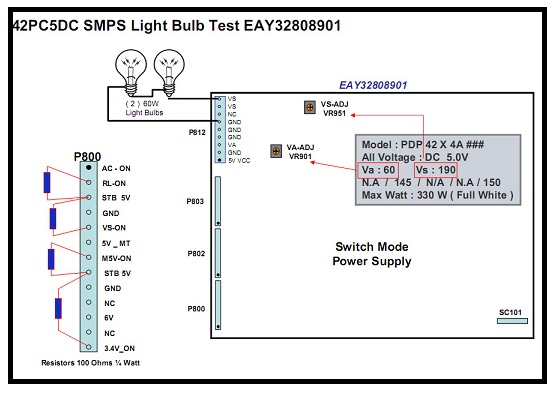
This test can confirm the proper operation of the SMPS without the need to exchange the board. The Operation of the Power Supply can be confirmed by removing the SMPS Board and placing it in the Service Position. Place two 60Watt lamps in series across pin 9 (VS) and 5 (Ground) of P812. Apply AC Power and check for 5V STB and AC-ON / DETECT at P800, if present remove AC Power and install a 100Ω? watt resistor from 5V STB to RL-ON on Connector P800. Apply AC Power, the AC Relays should close and 19V, 12V and 6V should be Present. If ok remove AC Power. Solder a 100Ω? watt resistor from 5V STB to 3.4V-ON at P800. Apply AC Power the 3.4V Supply should now be present. If ok remove AC Power. Install a 100Ω? watt resistor from 5V STB to M5V-ON on Connector P800, 5V Vcc should now become active, If present remove AC Power. Install a 100Ω1/4 Watt resistor from 5V STB to VS-ON on Connector P800, VS and VA should now be present. This test will confirm the normal operation of the SMPS.
For more repair information on plasma tv, please click the button below to visit:
Thanks and have a great weekend!
|
|


